 Surveying & Architects A unique platform of Civil Engineering
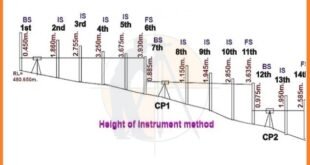
How To Use A Dumpy Level With Full Example
A dumpy level, also known as an automatic level or builder’s level, is a tool designed to find the height of landmasses. Though these devices may look intimidating or confusing, dumpy levels are fairly easy to use once you know how to set them up and what kinds of measurements they provide.
Setting up Your Level
 1
1Find a benchmark location near the spot you want to measure. A benchmark location is a spot that you already know the height of thanks to previous land surveys. In order to get the most accurate data out of your dumpy level, you’ll need to search online and find a benchmark location located close to the spot you want to measure.
Other Post
-
How To Estimate Per Meter Weight Of Reinforcing Steel Bar
-
What is crank Length of reinforcement
-
How do you take off a Staircase
- If you can’t find a benchmark location, you can measure from a distinct land feature, such as a large tree or building, instead.
-
 2
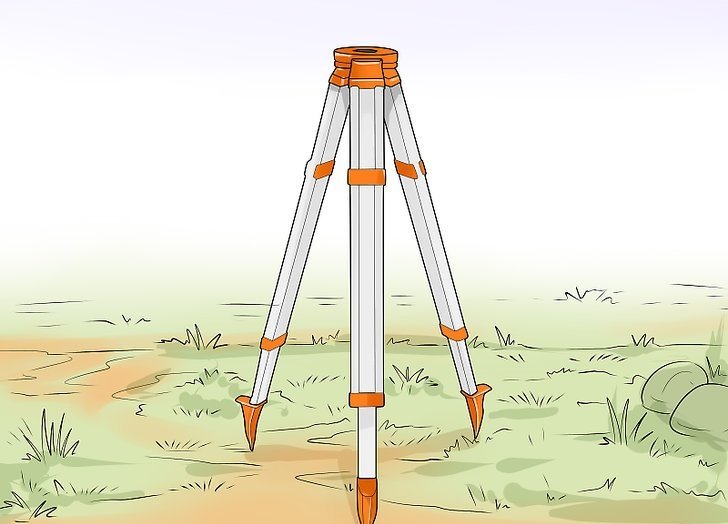
2Set your tripod up near the spot you want to measure. Place your tripod on a patch of flat, clear ground that sits between your benchmark location and the spot you want to measure. Then, undo the latches on your tripod’s legs and extend each leg out. Adjust the legs until your tripod is completely level, then close each latch.
- Almost all tripods come with a built-in bubble level. You can use this to assess whether or not the tripod is level.
- To measure the area properly, make sure you set up in a spot that’s slightly higher than your benchmark location.
 3
3Connect your device to the tripod and position it over 2 leveling screws. Screw your dumpy level onto the tripod’s base plate, then connect the base plate to the main tripod body. Once the instrument is securely attached, turn the dumpy level’s telescope so that it sits parallel with 2 of the device’s leveling screws.
- If the dumpy level wobbles when tapped, tighten the leveling screws to better secure the device.
 4
4Level the device by adjusting the 2 leveling screws. Look for a traditional bubble level located somewhere on your device. When you find it, grab the 2 leveling screws that are parallel to the device’s telescope and twist them in opposite directions. Do this until the bubble sits in the exact center of the level.
- For the best results, turn the screws with an even amount of force and pressure.
- You’ll typically find the bubble level either on top of or below the device’s telescope.
 5
5Turn your telescope 90 degrees and adjust the third leveling screw. After adjusting your first 2 leveling screws, turn your telescope approximately 90 degrees so that it sits parallel to the device’s third leveling screw. Then, adjust this screw until the bubble once again sits in the center of the level.
- Vintage dumpy levels often have 4 leveling screws instead of 3. If this is the case for your device, adjust the second pair of screws just like you adjusted the first pair.
 6
6Check your level’s calibration by turning it 180 degrees. After making your initial leveling adjustments, return your telescope to its starting position and check that the bubble still sits in the center of the level. If it does, turn the telescope 180 degrees and check the level again. You can focus the device once all 3 positions show the bubble in the center of the level.
- If the bubble is not centered in any of the 3 positions, repeat the leveling process until it is.
Focusing Your Level
 1
1Remove your dumpy level’s lens cap. The lens cap protects your device’s lens from unwanted dirt, grime, and debris. To avoid damaging your instrument, leave the lens cap on until you’re ready to use the device.
Learn More
-
Calculation Method For Find Out The Overlapping Length Of Beam, Column And Slab
-
Bar Bending Schedule For Slab And Estimation Of Steel Reinforcement In Slab
-
How To Calculate The weight of Steel With Formula
-
How to calculate the cutting length of reinforcement bars in circular R.C.C slab
- If your lens is dirty, wipe it down with a pre-moistened lens wipe. You can find these at most camera stores and a number of big-box stores.
-
 2
2Adjust the eyepiece until you can see the device’s crosshairs. Place a sheet of paper or a similar object directly in front of your device’s lens to occupy its entire field of vision. Then, turn the eyepiece’s focusing knob until you can clearly see the dumpy level’s crosshairs.
- When finished, your crosshairs should appear dark, sharp, and easily noticeable.
 3
3Twist the device’s focusing knob until the image is clear. Once you can see the crosshairs, point your device’s telescope toward your benchmark spot. Look for a large, distinct object in the area, such as a tree or hilltop, then twist your device’s primary focusing knob until the object comes into focus.
- If you’re having trouble focusing, ask a friend or colleague to hold an E staff near the benchmark spot. This metered measuring stick will give you an easy object to focus on.
Taking a Measurement
 1
1Position an E staff on top of your benchmark spot. If necessary, purchase an E staff online or from a survey equipment shop. Then, have a friend or colleague hold the staff on top of your benchmark spot.
- For the most accurate measurements, have your friend rock the staff forwards and backward and record the lowest number you read.
- Most E staffs collapse to save space, so make sure you extend your staff before taking any measurements.
- Use a fiberglass staff instead of a metal version if you’re taking measurements in an area beneath power lines.
 2
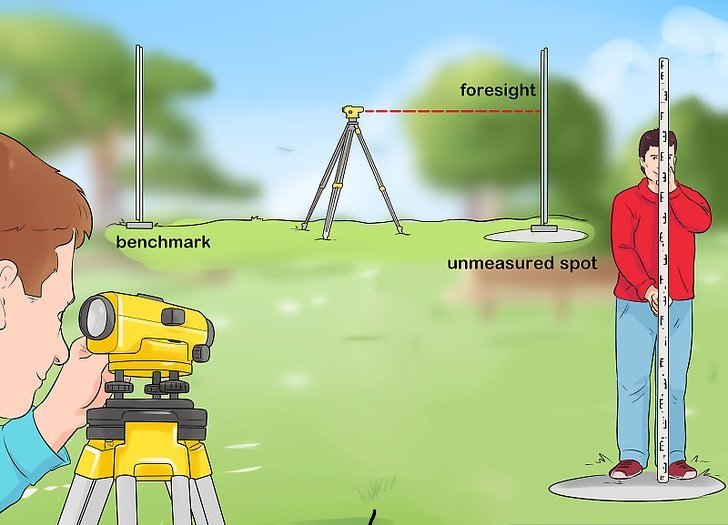
2Find the height difference between your level and the benchmark spot. Look through your dumpy level’s telescope and locate the E staff. Then, record the measurement indicated by your device’s center, horizontal crosshair.
- This measurement is known as your backsight.
- Each numbered section of your staff represents 10 cm (3.9 in). Within these sections, every block indicates 1 cm (0.39 in) and every E indicates 5 cm (2.0 in).
 3
3Calculate your level’s actual height using the benchmark height. Once you have your backsight measurement, add it to your benchmark location’s actual height. This will give you the current height of your dumpy level’s telescope.
- Record this measurement so you can use it to find the height of your next spot.
 4
4Find the height difference between your level and the unmeasured spot. Move your E staff so it sits directly on top of the spot you want to measure. Use your device’s telescope to find the staff, then record whatever number the device’s center, horizontal cross-hair sits over.
- This measurement is known as your foresight.
- If necessary, adjust your eyepiece’s focusing knob until you can see the staff.
- If the spot is too high or far away for you to measure, move your staff to a lower, closer spot first. Find the height of this new spot, then move your dumpy level to it and restart the measuring process.
 5
5Calculate the spot’s actual height using your level’s height. Unlike with your previous calculation, you’ll need to subtract your foresight measurement from your dumpy level’s actual height. This will give you the height of the spot you measured.
- When your record this height, make sure to include a thorough description or diagram of the spot you measured. That way, if you return to the area, you’ll be able to find the measured spot easily.
Learn More
-
-Concrete Test: Slump test, compression test, split tensile test, soundness etc.
-
-Soil Test: Core cutter test, compaction test, sand replacement test, triaxial test, consolidation test etc.
-
-Bitumen Test: Ductility test, softening point test, gravity test, penetration test etc.
To get more information, Visit Our Official website
Land Surveying & ArchitectsJOIN US & LIKE OUR OFFICIAL FACEBOOK PAGE
THANKS.