 Surveying & Architects A unique platform of Civil Engineering
Layout Procedure Of The Building Footings
Following is the step-by-step procedure for the layout of RCC footings.

1. Cleaning:
The PCC should be cleaned by removing all the wooden logs, fallen soil, debris, etc. Washing with water is a must if there is a layer of mud splash over the footing PCC.
2. Shoring:
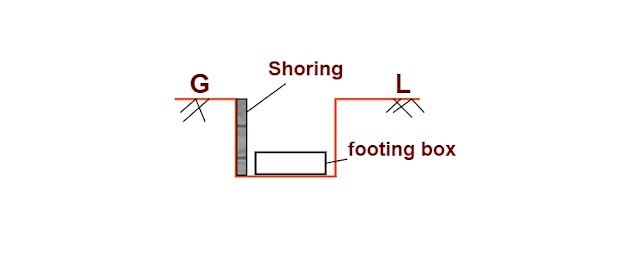
If the excavated footing pit has a moist or loose soil surface, then proper shoring is necessary to prevent the mudslide while concreting. At the time of concreting, if the mud falls within the footing, removing them becomes a tedious job.
Learn More
How To Design The Pier Beam
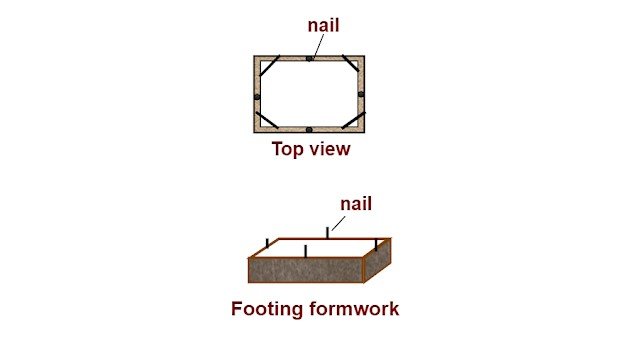
3. Footing box:
All the dimensions of the footing box should be checked before installing them over the PCC. The center point of all the four sides of the box should be marked by nailing as shown in the drawing.
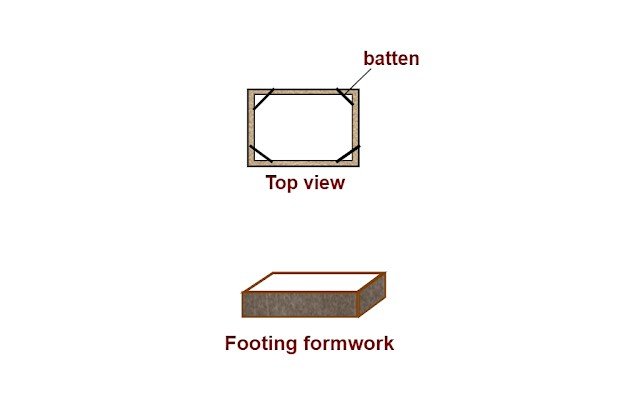
The formwork should contain the wooden battens diagonally at the four corners, for holding the box in their shape. The diagonal of the box should be checked for its accuracy.
4. Orientation:
The length & breadth side of the footing box should be checked for its proper direction along the grid line. The box should be kept as per the x & y-axis of the grid line.
Learn More
Practical And Basic Knowledge of Civil Engineering
5. Gridline:
The lineout string should be tied over the footing gridline in both the axis. The gridline should be transferred over the box by using a measuring tape & a plumb bob. All the footing nail markers ( center mark) should be brought under the plumb bob for positioning the box in line with the gridline.

Once the footing box is positioned, proper support should be provided on all 4 sides. The support should be given both at the top & bottom part of the box.
6. Footing mesh :
The footing reinforcement should be checked for the bar diameter along both axes & for their spacing. The L- bend at the end of the rebar should be as per the drawing. Ensure the dimension of the mesh, before placing them within the box.
7. Covering:
The mesh should be centered to have a uniform cover on all four sides of the box. You have to provide the proper bottom cover for the footing mesh as per the specification.
Learn More
Load Calculation On Column, Beam, Wall And Slab
8. Column reinforcement:
The column reinforcement should be checked for,
a. The diameter of main bars & lateral ties.
b. The development length of the main bars.
c. Type of lateral ties & no. of legs.
d. Spacing of lateral ties & main bar.
e. Dimension of the columns & their orientation.
9. Column erection:

The column reinforcement should be erected at the center of the footing mesh. The gridline of the column should be checked with the help of measuring tape & string. The verticality is checked by using a plumb bob. Once positioned, props are used on both axis to secure the reinforcement center, as per the grid line.
10. Dewatering:

If the footing pit contains water, a pump should be installed for dewatering. The pit should be dewatered completely before you start concrete work. At any cost, the water should not enter the concrete before its setting time. The dewatering should be done at regular intervals, & the process should be continued at least for one hour after the completion of concreting.
11. Level marking:
The top level of the trapezoidal part of the footing should be marked over the reinforcement.
Learn More
Calculate Center To Center Distance Between The Bars In Column – Beam And slab
12. Concreting:
The grade of the concrete should be checked before you go for the batching of concrete. While pouring the concrete, you have to use a chute to avoid the segregation of concrete. Otherwise, a worker should be placed at the pit to pour the concrete.
Concrete should be poured uniformly from all the sides of the footing box. If you pour them at one location, the uneven concrete load may displace the column reinforcement.
13. Compaction:
An immersion vibrator with the proper needle size should be used for the compaction work. The compaction should be done as per the specification.
14. Finishing:
All the footing surfaces should be finished smoothly except the column part. The flat column junction part should be kept rough for future bonding. The top level of the footing slope should be kept up to the marking. The inclination should be uniform on all four sides without any dents or bulging.
Learn More
Bar Bending Schedule Of Lintel Beam With Full Detail
15. Curing:
From the next day, curing should be done till its completion period.
Get Benefits And Share With Others…
Other Post :-
-
Design Of Strap Footing With Full Detail
-
HOW TO CALCULATE STEEL QUANTITY FOR SLAB WITH BAR BENDING SCHEDULE